Stress, prolonged sitting, running, cycling, and many other activities can contribute to tension and tightness in the hips, back, and pelvic floor.
Restorative yoga involves longer held resting postures using supportive props. Unlike active stretching and movement practices that require muscular effort, it’s a form of passive stretching. Your body needs both to maintain balance and optimal joint health. A restorative practice creates conditions that allow your body and mind to shift into a state of relaxation and release muscular tension.
Although restorative yoga might look easy compared to flow yoga and advanced poses like handstand and back bend, it’s not. Poses that require stillness can be more difficult especially for those who live an active and fast-paced lifestyle and have a hard time slowing down mentally and physically.
Give yourself permission to rest and receive the benefits of stillness. You might feel like you’re not accomplishing anything, but the mental and physical benefits are vast and well worth it.
This bridge variation sequence is perfect to do every day, at the end of a stressful day, or after a strenuous workout.
Try all three poses or pick your favorite pose.
Once you’re positioned in the pose, take a few slow deep breaths with your attention resting on the flow of your breath as it moves in and out through your nose. Then, take a scan of your whole body. Notice where you’re holding tension. On your inhalation imagine moving your breath into the places where you feel tight and restricted. On the exhalation feel a sense of release.
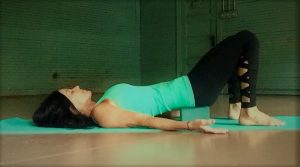
Supported Bridge Pose
To get into each the pose: lie on the floor with your knees bent and feet flat on the floor. Press your feet into the floor to lift your hips then slide the block beneath your pelvis. Let your hips settle evenly into the support of the block. Turn the palms of your hands to face upward. Relax your shoulders, neck and face muscles. Hold 5-10 minutes.
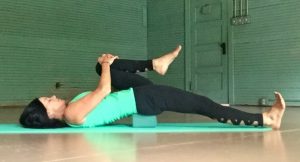
Single Knee to Chest
Gently pull one knee toward your chest. Straighten the opposite leg and let your heel rest on the floor while reaching through the ball of your foot. You can also try this without the block. Hold 3-4 minutes each side.
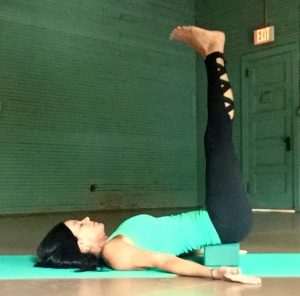
Waterfall
Straighten your legs toward the sky. Position your hips so they’re resting evenly on the block. If it’s too difficult to hold your legs up, slightly bend your knees or try it without the block or with your legs against a wall. In addition to easing tension in your back and hips, this pose can improve circulation and digestion, reduce high blood pressure and calm the nervous system. Hold 5-10 minutes.
Tips: A yoga block can be used at three different heights. Choose a level that is appropriate for you and gives you the most ease. For beginners, I suggest starting at the lowest level as pictured in the photos. You can also use a folded blanket or towel instead of a block. Always listen to your body. If a pose produces pain, gently come out of the pose.
To come out of the pose: press into your feet to lift your hips then slide the block out from under you and gently lower your back to the floor. Roll onto your side. Then slowly make your way to an upright position.
Try it and let me know how it goes.
***This is not a replacement for medical treatment. Please consult a qualified professional for medical care if needed.
Wishing you well,
Lynette Mattina
Integrative Coach | Yoga Teacher |Movement Educator
www.lynettemattina.com
Connect with me on Facebook and Instagram for yoga and movement tips and inspiration.
Contact me for more information about private coaching or yoga, corporate wellness, Introduction to Self-Care or The Art of Living With Intention.


